Showing posts with label homemade. Show all posts

Wednesday, June 1, 2011

My 150th post! (And strawberry yogurt pops!)

Have I really rambled on through 150 posts? Wow. :)

I decided to make some yogurt pops for the kidlets with my homemade yogurt
(I'm making about 2 batches a week right now!)
And this is how it went down:


I made one jar with a bit of my fresh jam, but it was a little sweet for my taste!
But you know I had to try it!


For the rest, I used fresh berries that I'd cut up and stored in the fridge.


Yum!


I mixed in some flax seed oil, probiotic powder, and raw honey!


I can't begin to describe how delicious it was!
Plain yogurt mixed with fresh berries and honey is just amazing!
The healthy fats from the oil and the immunity boost from the probiotic powder is just a bonus!


Some of the yogurt I saved just to eat!


The rest I froze for the kiddos!


Delicious!


Tuesday, May 31, 2011

My homemade laundry detergent!

I finally needed to make more laundry soap, so here is my recipe!


1 cup of  castile soap
1/2 cup borax
1/2 cup washing soda or baking soda

shake well!

1 tbsp for a light load
2 tbsp for a heavy load
1/2 tbsp for HE washers


I love the peppermint Dr. Bronner's castile soap!
Some people use Fels Naptha soap for this part, but I think that is a little harsh for my kids!


Grate it finely!!
Pieces too large will be hard for your machine to use effectively.


To get what you need, it will take about 2/3 of a bar of the soap.
I save the last bit to wash myself with!
:)


Borax!
Cheap as dirt, can be used for many things!


Washing soda!


Shake well!
I keep it in an old pasta sauce jar that I can't use for canning.


Since I use an HE front loader, I use 1/2 tbsp per load.
Yep, on my jar is says tsp, but I meant tbsp.
Blame my mommy brain!


Sunday, May 22, 2011

My Mason jar love!

As many of you have probably figured out, I hate Mason jars.
Okay, not really.
I absolutely adore them!

I've been given so many by amazing friends
(Thank you, Darlene and Carol, in particular!)
in hopes that I will be able to preserve tons of fruits and veggies this year!

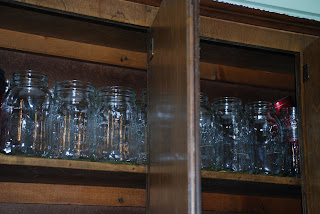
Here is a top shelf photo of only two kitchen cabinets-
full of potential.


This is a lid that I won't be able to use to can,
so this one was chosen to receive a makeover!


Thanks to Carol for this particularly awesome honey jar!
I chose this one because of the measurements indicated on the side.

I read a tutorial on Easie Peasie for Mason jar soap dispensers.
You know I had to try to make one!

It will perfectly match the little Mason Jar Light that was just purchased, but hasn't arrived yet!
(Messing with electrical stuff is a little beyond my capacity at this moment in time!)


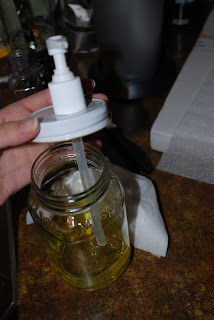
I cut a hole in the lid big enough to put a pump through.
I cut it a little small so that it would fit snugly.
Apparently, some people glue theirs down-
I didn't, since it wasn't budging once it was in there!


I filled the mason jar with my lemon Trader Joe's soap from Beatrice of Sew Bea!
(thank you, thank you!)
The pump top for the jar is from this bottle.
The original soap container was recycled!


I can refill it any time!
And this particular jar, since it was my trial run, will be put in the kid's bathroom.
I'll use a smaller Mason jar to make one that will fit easily behind my kitchen sink.


I thinned the soap out to make it easier for small hands to scrub up!
And here it is!

Please pardon the lighting on the photos- my husband was packing for a business trip, I was feeling crafty, and it was about midnight!

Thanks again to Tiffany of Easie Peasie for the great idea!
Thanks to Beatrice of Sew Bea for the fantastic giveaway that provided the soap!
Thanks to my sweet friends who pass on their canning jars!
:)

Tuesday, May 17, 2011

Homemade yogurt!!

I will be perfectly honest. I've had a yogurt maker for more than two years (according to my Amazon account) and have just this week started using it. I bought it, full of excitement, dreaming of all of the yummy yogurt I would make with it... and then life happened. I forgot about it with a new baby in the house. I moved, found it, and then had to leave it in storage.

Well, we're HOME! And I unpacked it, read the directions, and made yogurt successfully! Makes me wonder why in the world I waited so long to try it!


All clean and ready to roll!


I bought a yogurt maker with glass jars. I typically don't heat food in plastic- I hate the idea of the chemicals leaching into our food. Glass is a much healthier alternative!


I boiled 42 ounces of organic, 2% milk.


As the milk cooled, I measured out 6 ounces of organic, plain yogurt. I had been meaning to buy some yogurt starter, but this is a perfectly acceptable alternative until it arrives in the mail.


After I mixed the yogurt (starter) into the cooled, boiled milk, I poured it into the 7 glass 6 ounce jars and loaded them into the machine- which simply keeps the yogurt consistently heated!


I set the timer for ten hours, per the directions, and went to sleep :)


I woke up in the morning to fresh, perfect yogurt!

Why are there only 6 when I made 7?
Taste test, of course!


That just excites me!!


Perfect serving of homemade yogurt.
The kids are going to be so excited!


I popped a top on each jar and stuck them in the fridge to chill.


My kids are mildly disappointed at the store when I, still, won't buy cute individual serving sizes of yogurt, snacks, drinks, etc. I hope that this and other efforts I've been making here will excite them. I know little kids love single servings in cute containers. I don't buy them (preservatives, high fructose corn syrup, trash factor, etc.), so I will continue to try to make them- waste free!

Friday, April 29, 2011

Who has two thumbs and fizz?! This girl!

I know that it isn't very crunchy of me, but I love carbonated beverages!

I have been lusting over home-carbonating gadgets for a couple of years now, but frankly, they have just been out of our budget.

I have had a really rough week this week  (even before my grandfather died yesterday) and clearly, my hubby sensed that I was not in a good place. He ran to REI to get himself a new watch band and came home with my Mother's Day present.

He not only got me a Sodastream, but he got me the Crystal version! I thought I would only ever get the basic version, but he got me one with resealable glass carafes. And I LOVE glass in my kitchen!

*swoon!*

The green patch on the lower right hand corner says that it takes no batteries or electricity!

Each bottle of CO2 will make 60 liters of carbonated water and we have a local place where they can be refilled for a really decent price!

Here are the lovely glass bottles, one with the lid on top, not sealed.
Pardon the counter mess- my 1 cup coffee maker and blender are permanent fixtures, even though they take up a ton of room.


Tim also got me a 3 pack of bottles of flavoring.
We've tasted them all and they are all tasty without being overwhelming!
My favorite so far is the orange.

The CO2 bottle (far right) pops into a hole in the bottom.
The bottle of water goes inside the canister.
You close and seal it and press the button on top 3 times to carbonate the water.
Easy peasy!

Raspberry sparkling water, sealed up and going into the fridge to be gulped later!


It's happy beside of my organic ACV!


A good picture of the bubbles!
Mmmmm fizzy!


Being a nerd waffle, I decided to take some fizzy water and combine it with orange juice.
Homemade Orangina, anyone?!
Heck yes!
And of course, I drink it with my Glass Dharma straw.
I LOVE these straws. I've had my 3 for right at 2.5yrs now and not one has broken!


As if my husband didn't absolutely spoil me rotten with that gift,
He encouraged my other addiction:
French cookware.
Specifically, Le Creuset.
Forgive this wanna-be locavore... it's my mother's fault!
(Sorry to throw you under the bus, Mom.)

I tried to fall in love with stoneware, but it is just so darn hard to care for and keep clean! I am a dedicated human being and don't mind things that are high maintenence, but enameled cookware is much more my speed!

This is a BEAUTIFUL baking dish (Tim said it will be perfect for baking up the perfect chicken and I believe he is right on the money!) in my color- the Caribbean blue.


Here is my new baking dish sitting beside of the butter dish my mother got me for my birthday last month. It's just the little things in life, guys...

Jelly

I am so excited to show you my first EVER canning efforts!

We went out in the yard and foraged some dandelion greens (wilted and served with vinegar = delicious!),
some dandelion blossoms,
some of our borderline invasive mint.


We soaked the dandelion blossoms in water overnight to extract as much of the dandelion goodness as possible!


Keelin was very helpful with washing the mint! Smelled so fresh.


Mint in the jar before we filled it with water!
I can smell it just looking at this picture.


Spicy tomato jelly,
dandelion jelly,
mint jelly!

All perfectly set, all delicious, all properly sealed in the jars!
I can't believe how easy it was to can my own jelly!
If this first timer can experience success, anyone can!


My favorite of the jellies, the "lively" tomato jelly on a slice of my homemade bread!

Recipes :

Dandelion Jelly


Boil 1 quart  of fresh dandelion blossoms (no stems) in 1 quart water for 3 minutes. Remove from heat and stir juice. Measure out 3 cups of the dandelion juice, add a teaspoon of lemon juice and 1 package of pectin, powdered works best for this recipe. Add 4.5 cups of sugar and boil until gelled. Pour into sterilized canning jars and leave 1/8" of headspace. Wipe the rims well, add lids and rings. 5 minute water bath and you're done! Just wait for the tops to pop!

Note: I cut this recipe in half and it made four 4oz. jelly jars full of jelly! Thanks to Jill at Domestic Reformation for inspiring me!
Tomato Jelly
(makes 6 medium glasses full)

Combine 1 3/4 cups of organic canned or jarred tomato juice, 1/2 cup of fresh strained lemon juice, 2 teaspoons of Tabasco sauce , 4 cups of sugar in a pot  over high heat until it reaches a full boil. Stir in one 3oz. package of liquid fruit pectin and bring to a full boil for 1 minute, stirring constantly. Remove from heat, stir, and skim off any foam for about 3 minutes. Pour into sterilized jars, leaving about 1/8" of headspace. Wipe jar rims, adjust lids and rings. Water bath for 5 minutes, then remove and wait for the lids to pop, signaling a good seal!

Note: I used more Tabasco sauce that the recipe called for and it was delicious. I just seasoned to taste and we enjoyed it pretty spicy!

Mint Jelly

Crush 1 1/2 cups of firmly packed mint leaves, fresh. Add 2 1/4 cups of water into saucepan with mint leaves and boil of medium-high heat for 3 minutes. Remove from heat, cover, and let stand for 10 minutes to extract the minty goodness! Strain through a cheesecloth. Measure out 2 cups of the infusion into a large saucepan. Add 3 1/2 cups of sugar, and 2 tablespoons of lemon juice. Boil at full, rolling boil for 1 minute, stirring constantly. Remove from heat and immediately add in one 3oz. package of liquid pectin. Stir and skim for about 5 minutes. Pour immediately into warm, sterilized jars leaving about 1/4" of headspace. Seal with hot lids and rings, waterbath for 5 minutes, then let set!

Note: I let my mint soak for a whole afternoon after it was cleaned, crushed, and boiled. Most recipes I read also said to add a couple of drops of green food coloring, but I opted to leave it out. I didn't feel any need to add color to something already so yummy- it wouldn't have enhanced anything but the look.

Do you have any delicious jelly recipes or fruit preserve recipes to share? I'd love to hear them!

Monday, April 25, 2011

Just a quick coop update!

Just a quick update on the chicken coop-
Otherwise known as the soap opera,
"As the Coop Turns"
;)
The bottom of the chicken wire wasn't quite as safe as I wanted it, since the ground is uneven and there were a few places that a determined snake or something could get under.

Tim remedied the issue by cutting trees that fell in the storm and putting them around the entire length of the chicken fence. He stuck a chair our there for me and we now jokingly refer to it as "the Observation Deck."

The other new thing is the left side of the fence. It all used to be super low to the ground, but Tim wanted me to be able to get in there easily even when my belly gets ginormous, so he built a frame and lifted it up! He's pretty awesome! I was just going to squat down and hope for the best, but thanks to my hubby, I don't have to worry about it anymore!

It did require the purchase of some chicken wire, but all of the wood was leftover from other projects, found in the woods/yard, or recycled!

Everyone, meet Hugh Heffner. He's our new Silver-Laced Wyandotte rooster! Isn't he handsome? Tim named him, saying it was only appropriate for the only rooster in the hen house! And so far, he seems to be quite the ladies man! He's been pretty polite with the crowing and he's got lovely manners, so hopefully it stays that way!

In other news, only a few more things need to happen to the yard before we are ready to let the chickens roam free some during the day! I am looking forward to seeing them go nuts in the yard after Tim mows and the bugs are out! They're going to be in hen heaven!